Sometimes we have directories full of audio files that we want to rename in bulk because we want to give them another name. Many go the slow and challenging way, which is to go one by one, naming them whatever they want. Renaming two or three MP3 files is not the same as renaming tens or hundreds of files.
Manually performing these tasks is time-consuming. By using different MP3 tag rename tools allow you to do it comfortably. This article discusses the 3 best methods to rename all your MP3 files at once without spending too much time.
Best MP3 Tag Renamer – Tidytag Music Tag Editor
The Tidytag Music Tag Editor displays the ID3 version 1 and 2 tag information. The program edits the file name, artist, title, album, genre, year, and track and image fields of the file. These fields can be modified quickly by going from one file to another without opening a new window. ID3 Tag Editor can edit the metadata tag information of MP3, FLAC, Ogg-Vorbis, Monkey’s Audio, Musepack, and Unicode compatible audio files. Due to the MP3 tag batch rename‘s capability, users don’t require to spend a massive amount of time getting their work done.
Key features
- Can use to edit files in batch-wise
- Allow changing multiple fields at once
- Both lyrics and album cover can be changed
- Loads metadata of the file in seconds
- Compatible with both Windows and OSx
How to Add and Rename MP3 Files via Tidytag in Batch
Step 1 Download Tidytag and Install
To download Tidytag, click on the compatible version of the setup from below. After that, install the setup to your device as installing a typical software.
Step 2 Add Music Files to Tidytag
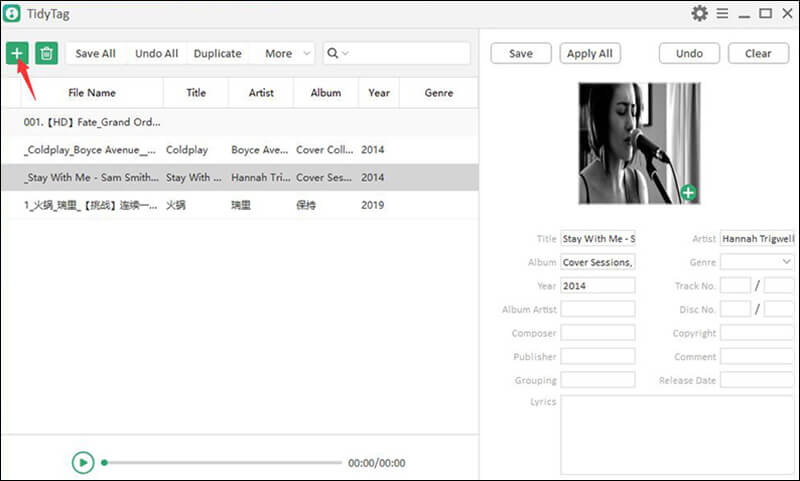
Click on the Add music files button in the home window and select the local disk’s music files and click OK to add them to the Tidytag, or click on the + mark in the top left corner of the home window and browse the required files and click OK.
Step 3 Rename the MP3 Files
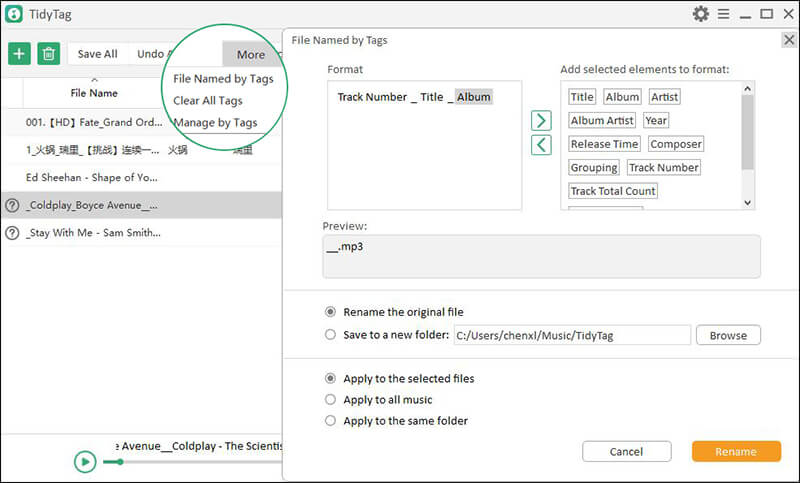
Then select the MP3 file, then click more > file named by tags. Now you can rename the MP3 files by adding selected elements to format.
Step 4 Complete the Batch Renaming
After that, click Apply to the selected files to perform batch rename all selected files. If you want to batch rename the file list, choose to Apply to all music; if you’re going to rename the folder which this selected file belongs to, please click Apply to the same folder.
How to Rename MP3 Files in Batch via iTunes
For those of you know about iTunes, you know that one of its most significant advantages is the fact that when you buy music within it, the albums come with the complete information at once. However, when transferring music from a device other than the Mac, such as the iPhone, or when transferring music from your PC to the iPhone, the information can sometimes be incomplete and represent a problem for the user. If that is your case, then to change the names of songs and albums in iTunes that are not as they should, you must do the following.
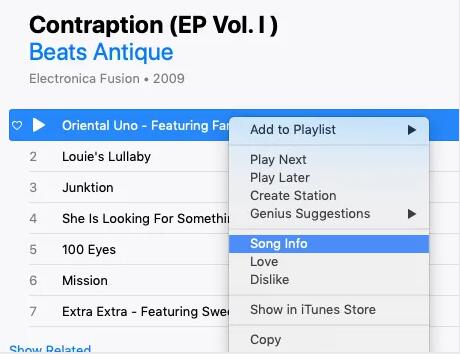
Step 1 First, open your iTunes application and go to the “Music” section, which is inside the Library. When you’re there, choose all the songs that you want to edit. Then right-click on it, and select Get Info from the list.
Step 2 Then change the names of each file and click OK.
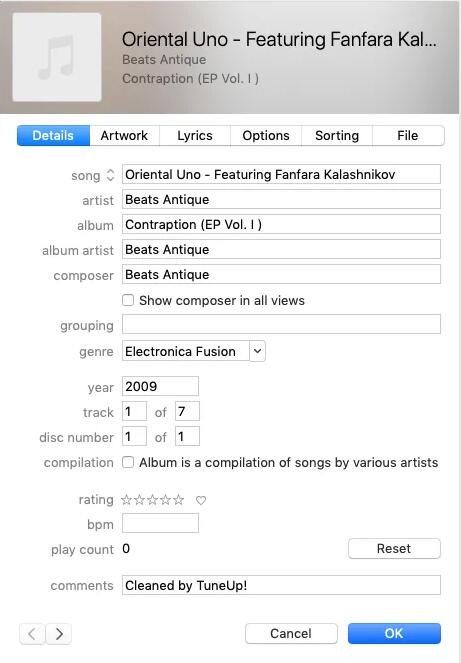
Step 3 If you want to rename all music files in batch, you can highlight multiple song files and batch change details on them using the “Get info” menu option.

How to Edit MP3 Tag and Rename in Batch Using MP3Tag
To change or create the tags of multiple MP3 files, we can use the MP3Tag tool. It is free software that barely weighs 3 MB, which will help us edit metadata of audio files.
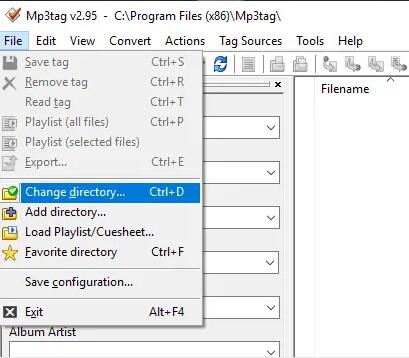
Step 1 Once you have installed and launched MP3tag, go to File and select the Change directory option from the list.
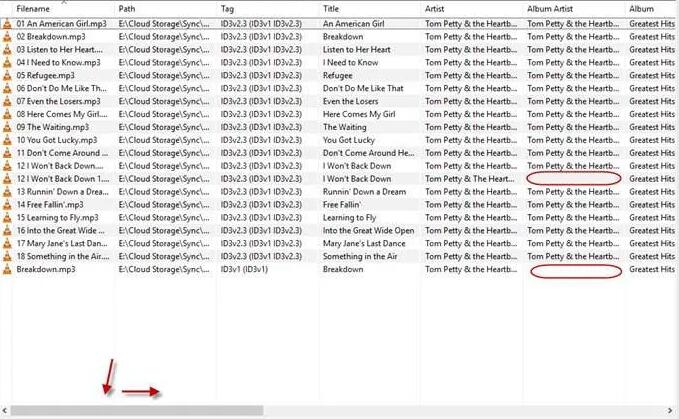
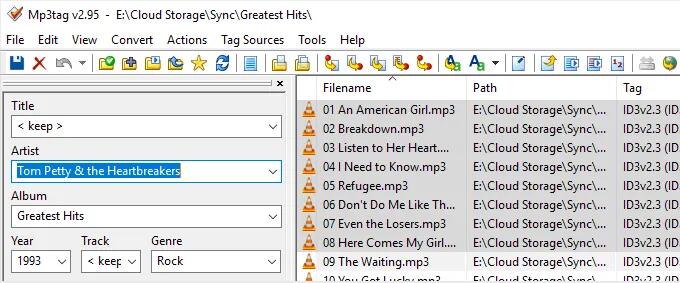
Step 2 Thereby, we can load the entire folder where we have music files saved. If you use the scroll bar along the bottom, you can see all of the metadata available. You can also see what information is missing with the gaps in the list.
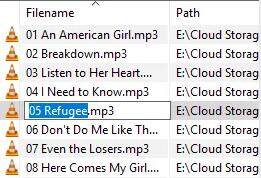
Step 3 You can directly type into those gaps and changes will be saved when you click outside them.
Step 4 The files appear in the central panel, and as we select them, we will see the data on the left side of the screen. If we want to change the same data from multiple files, we have to select them all in the right panel and change the information on the left.
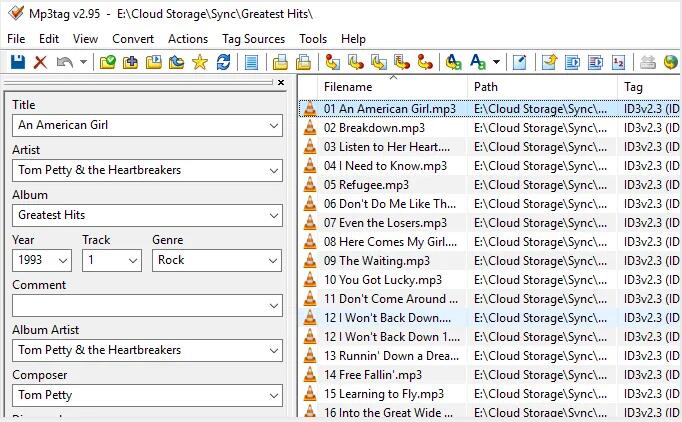
Step 5 You can also batch-rename metadata by highlighting more than one song, then changing it on the left. The metadata will be instantly saved in all highlighted files. But to save the changes permanently, you must click the blue disk button in the top left hand corner (under the File menu).
Why Choose Tidytag
Tidytag supports a considerable amount of file to rename simultaneously, even though the MP3 files are from the file list or different folder. The process is straightforward, and you don’t have to click each file manually. But considering the other 2 methods, you need to click each file individually and make the necessary changes, which is time-consuming. Tidytag is the only MP3 tag rename tool in the market; you can buy for a flexible price.