Looking for how to edit mp3 tag on iPhone? As we all know, iPhones are a little bit complicated than other smartphones. So in this article, we will help you find the best ID3 tag editor iPhone solution using which you can edit ID3 tags and manage your music library on your iPhone.
Unfortunately, every audio file we download does not have a proper ID3 tag so “how to edit MP3 tag on iPhone” remains one of the most asked questions for the iPhone community. Here we will discuss the top 5 easiest methods for ID3 tag editing.
Method 1: How to Edit Music Tags via iTunes
iTunes is the most convenient and versatile application, when it comes to ID3 tag editing for your iPhone. It is the safest, securest, and indeed the only official way of editing ID3 tags on iOS devices.
Follow these steps to see how to edit the mp3 tag on an iPhone:
Step 1 Install and Launch iTunes
Install iTunes on your PC and launch it. Now connect your iPhone and wait for device detection. Click “Trust” on the screen of your iPhone.
Step 2 Go to the Music Library
Now, choose “library” and go to music. Here, you will see all the music files your iPhone has.
Step 3 Choose the File
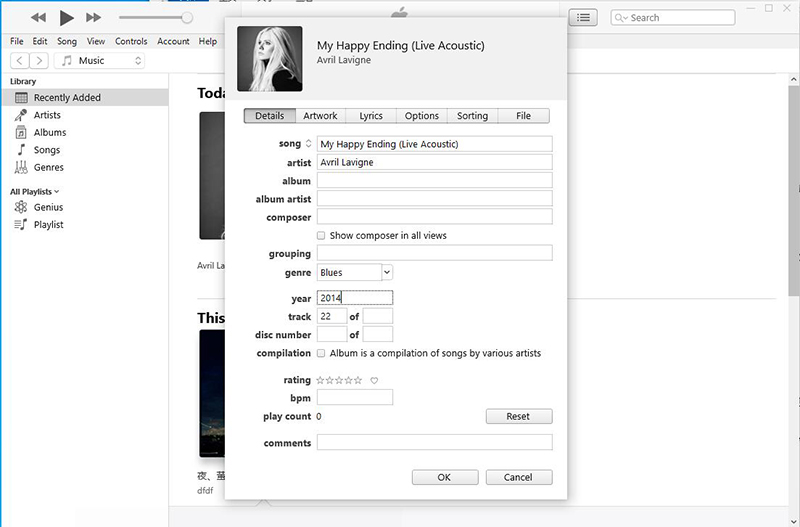
Select the music file you want to edit and right-click on it and choose “Album Info”. A dialog box will appear.
Step 4 Edit and Save
Make changes and edit tags as you want and click “Ok” to save the changes.
Step 5 Click on “Sync”
Click on the “sync” option to start the changing process. All the changes you have made have been saved.
Method 2: Edit Music Info on iPhone with IOTransfer Software
To edit ID3 tags, you can use other software as well other than iTunes. IOTransfer is a reliable alternative to iTunes that enables you to manage all type of iPhone data. You can also use it to edit to iPhone music tags with just a few clicks. Here are the steps of how to edit MP3 tags on iPhone.
Step 1 Install and Launch IOTransfer
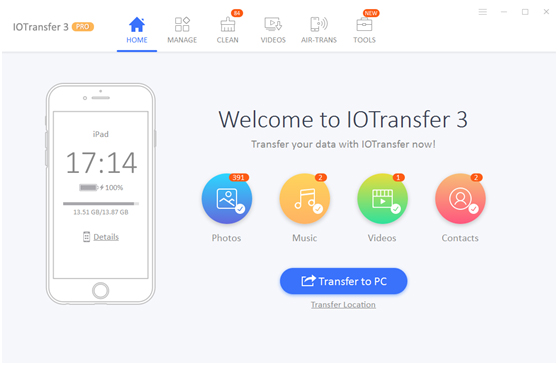
Install IOTransfer iPhone transfer software and launch it on your PC. Connect your iPhone with your computer and wait for device detection. Click “Trust” from the pop-up screen appears on your iPhone.
Step 2 Manage Your Files
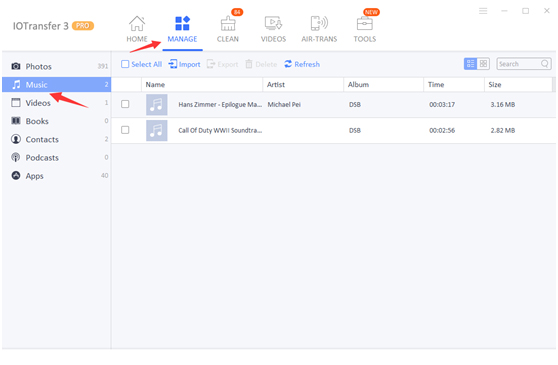
Select the “Manage” option from the toolbar and click on the “music”, then all the mp3 files will be listed on the interface.
Step 3 Edit and Save
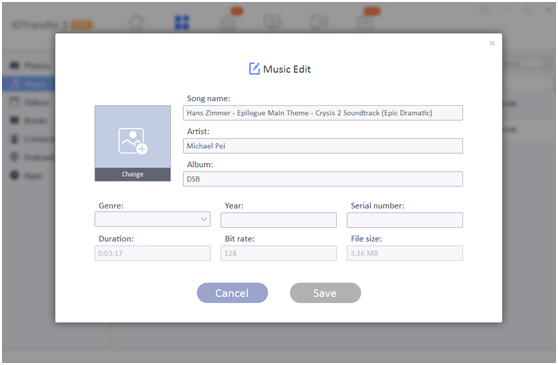
Move your mouse cursor; you will see a pencil sign on the left of the music title. Click on that pencil, and the editing window will pop-up. Now make all the changes and click on the “Save” option.
Method 3: How to Edit Music Info on iPhone with MP3Tag APP
MP3Tag is a specialized music tag editor for iPhone and iPad. This iOS based application is easily available on the App store and can be used to edit all popular audio tags. It supports various audio formats such as MP3, OGG, FLAC, OGA, MPC, SPX, and many more. Through its auto-correction, the app automatically finds out the missing audio tags and modifies the broken metadata information.
Step 1 Install MP3Tag App From the App Store
First of all, open App store on your iPhone and search for the MP3Tag. Once you’ve managed to find this ID3 tag editor iPhone app, install it on your device.
Step 2 Launch the App on Your iPhone
When the downloading and installation gets completed, launch the App to start editing the ID3 tags of audio files.
Step 3 Select the Audio File
Then on the main interface of the App, tap the “Files” button located at the bottom of the screen, if you want to edit the music tags of local audio files on your iPhone. Next, select the particular music file that want to edit with the App.
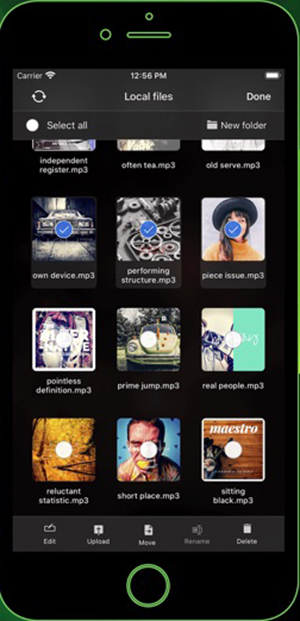
Step 4 Edit Music Tags
After opening the particular music file, you’ll be provided with different audio tags like title, artist, album, release year, track number, genre, etc. Edit the music tags and you can also change the album cover here.
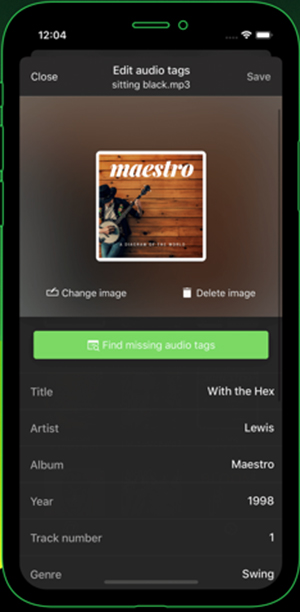
Step 5 Save the Changes
Once you’re done with all the editing, press the “Save” button on the top-right corner to save all the corrected metadata information.
Method 4: How to Edit Music Tags on iPhone with Evermusic
In addition to IDE tag editing, Evermusic allows you to download music files and connect to your music library located in the iCloud storage. We are going to discuss the steps for how to edit mp3 tag on iPhone.
Step 1 Connect iCloud and Open the Files
The first thing you have to do is connect the iCloud account and then open the music files in the connected account.
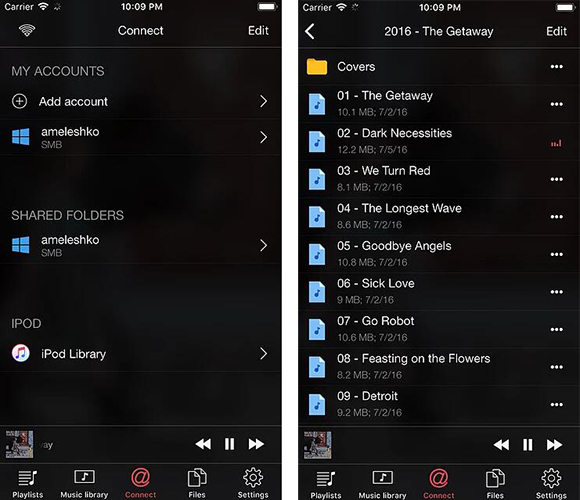
Step 2 Edit MP3 Tag
Now select more “…” options and different options will appear on your screen. Select the “edit audio tags” option.
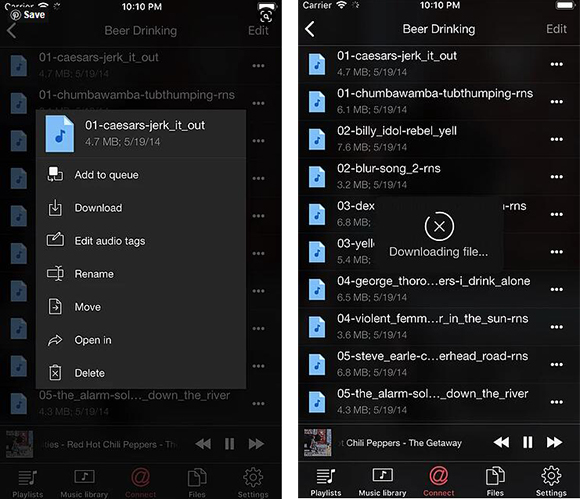
Step 3 After Downloading the Edit Screen Appears
After the downloading of the audio file is completed, the editing screen will appear. Edit your file as required. You can change the title, album, year, artist, and more.
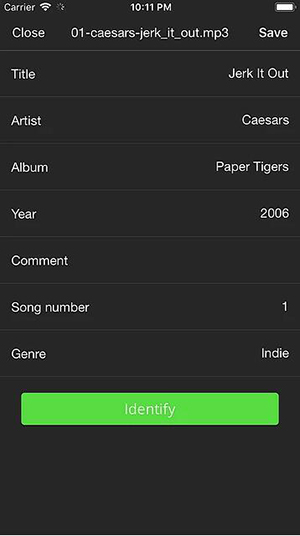
Step 4 Save the MP3 Tags
When all the changes have been made, click on the “Identify” option. Then the app will upload your edited file back to iCloud.
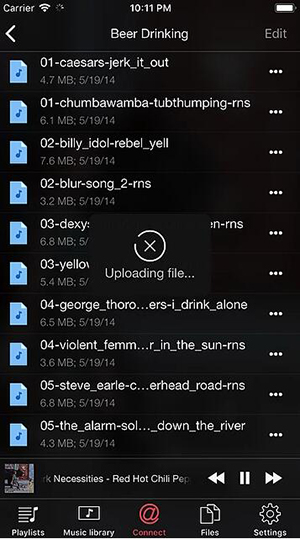
Method 5: How to Edit Music Tags on iPhone with Tidytag
If you want to edit tags of many files at the same time, then we’re going to introduce the best ID3 tag editor. TidyTag Music Tag Editor is a powerful and versatile software that can edit tags of your music files with the simplest method. It can manage and organize your music library by removing duplicate files as well. You can simply use this amazing software to edit mp3 tags on computer, and then, easily transfer the files to your iPhone.
The following are the salient features that make TidyTag Music tag editor superior than other solutions:
- Most powerful music tag editor that can batch process all wrong or missing tags at once.
- Compatible with a wide range of audio output formats including MP3, M4A, AIF, FLAC, OGG, AIFF, etc.
- Automatically scans the duplicates using different file attributes.
- You can make separate folders to organize your music files
- iTunes supportive, you just need to drag and drop the iTunes music into the program
- Comes with a built-in music player for easy playlist management.
- Supports almost all metadata formats.
How to Edit Music Tags Using Tidytag
To edit mp3 tags on your iPhone, TidyTag is the best tool. All you have to do is follow these steps and then transfer it to iPhone via iTunes.
Step 1 Downloading and Installing Tidytag
Tidytag music tag editor can be downloaded from their official website, or the links are given below.
Step 2 Add Audio Files to Tidytag
To add audio files to Tidytag, open the Tidytag and click on the Add files icon. After clicking on it, your computer’s music library window will pop up. Now select the audio files to be added and click on Open. Audio files can also be added through drag and drop method, drag the audio files to the main interface of Tidytag and drop them.
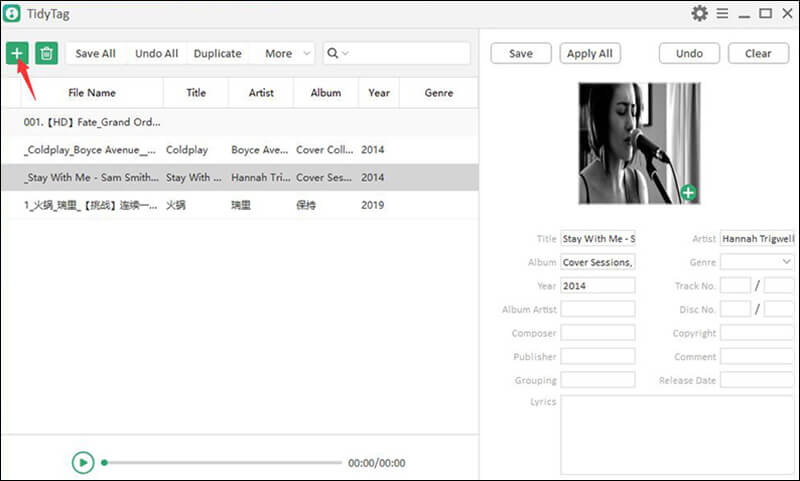
Step 3 Select and Review File’s Metadata Tags
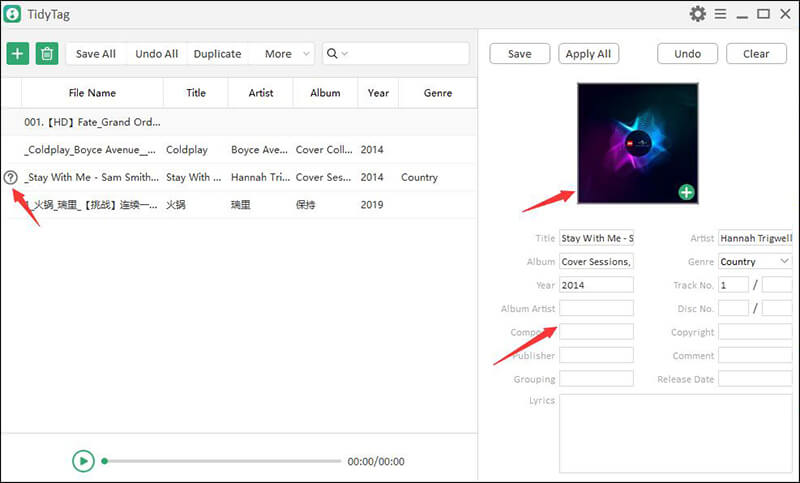
Now to review the file’s metadata tags, select the files. The Tidytag will show the file’s metadata tags including Title, Artist, Album, Genre, Copyright, Publisher, Year, Disk number, composer, Album Artist, Release date, Track number, lyrics and Cover on the sidebar at the right side of the Tidytag Interface.
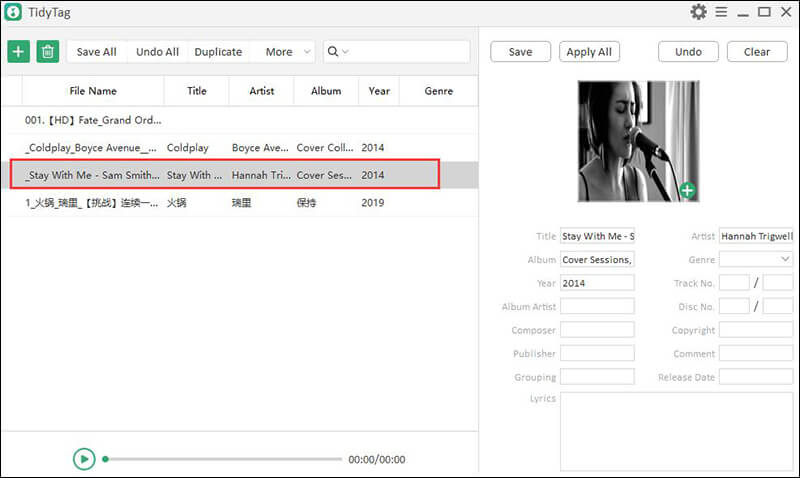
Step 4 Add or Edit Tag
To add or edit the audio file’s metadata tags, select and change them to your will. You can also add or change the existing cover photo of the audio file by clicking on the + sign on the cover photo and select a photo from your computer.
Step 5 Saving Tags
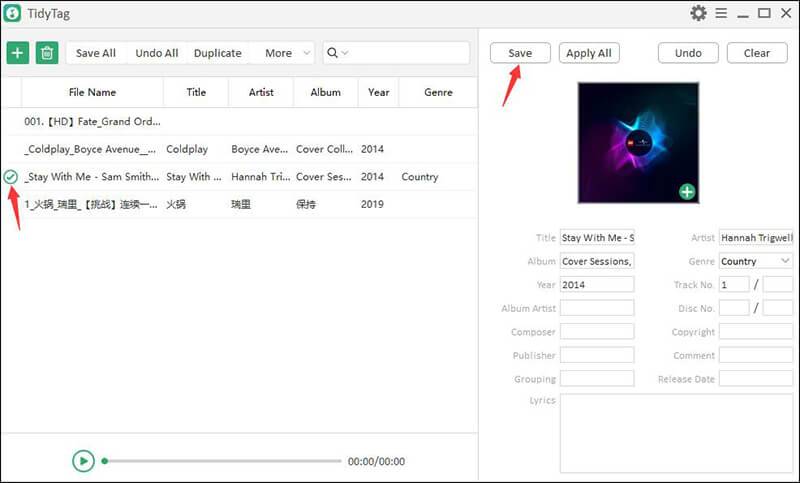
After changing or editing the audio files, click on the SAVE icon at the top of the sidebar and apply the changes.
Step 6 Transfer All Files to iPhone via iTunes
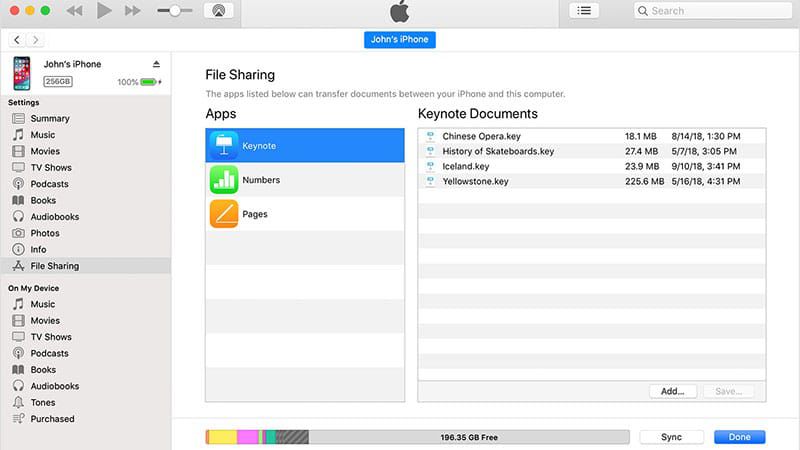
Connect your iPhone to PC with the data cable and launch iTunes. Click on the iPhone symbol on the top left button of the interface and go to the media sharing option. Select the file you want to transfer to your iPhone and tap on the transfer button. Your music files are now transferred to your iPhone.
In Conclusion
In this article, we have discussed the different methods of how to edit mp3 tag on iPhone. Now, you can use different tools or applications to edit ID3 tags, but the most recommended method is to edit tags using the TidyTag music tag editor. To avoid any inconvenience, follow the mentioned methods, it will save your time and make your job done in a straightforward manner.