In an era of streaming music like Spotify and Apple Music, where everything is categorized and searchable in seconds, you may find tag editors useful when browsing your old collections. The ID3 tag editor allows you to organize your existing song library to fill in missing metadata information such as album art, genre, etc.
Why manage your MP3 when you can stream music easily? Well, MP3 is still useful where there is no internet, like camping or hiking. ID3 Tag Editor is considered to be one of the best tag editors in the market, and we’ll discuss its features with the features of a new alternative solution.
What is ID3 Tag Editor?
ID3 Tag Editor is the most popular and powerful-to-use tool for editing the metadata of audio files. It supports batch editing of ID3v1, ID3v2.3, ID3v2.4, iTunes MP4, WMA tags, Vorbis, and APE Tags for multiple files at the same time, covering various audio formats.
Also, it supports online database searches such as Discogs, MusicBrainz or freedb, which allows you to automatically collect the tags you want and download covers for your music library. You can rename files based on the tag information, replace characters or words in tags and filenames, import/export tag information, create playlists, and more.
Key Features
- Can save images, pictures and album art in MP3 and WMA tags
- Allow editing attached images and lyrics
- Can change multiple fields in multiple music files simultaneously
- Filename generator based on tags
- ID3v1 and ID3v1 supported with Lyrics3 tag
- Support both Windows 32-bit and 64-bit Editions
How to Use ID3 Tag Editor
Step 1 Download ID3 Tag Editor and Install
To use ID3 tag editor, first, you need to download it from the official website. Once it is installed, click on the setup and install it to your device.
Step 2 Add Audio Files to the ID3 Tag Editor
To add the music files, open the software and click on the Add file button in the home window. Once you click on it, another window will pop up to select the music files. After selecting files, click on the OK button.
Step 3 Add or Modify Tags
Once the files are added, you can modify the ID3 tags by clicking on the file name. When you click on the file name, metadata will load in the window. For both ID3v1 and ID3v2, you’ll find 2 tabs in the ID3 tag editor. For bulk metadata removal, you can use the 2 buttons available at the bottom with the names; Remove ID3v1 and Remove ID3v2.
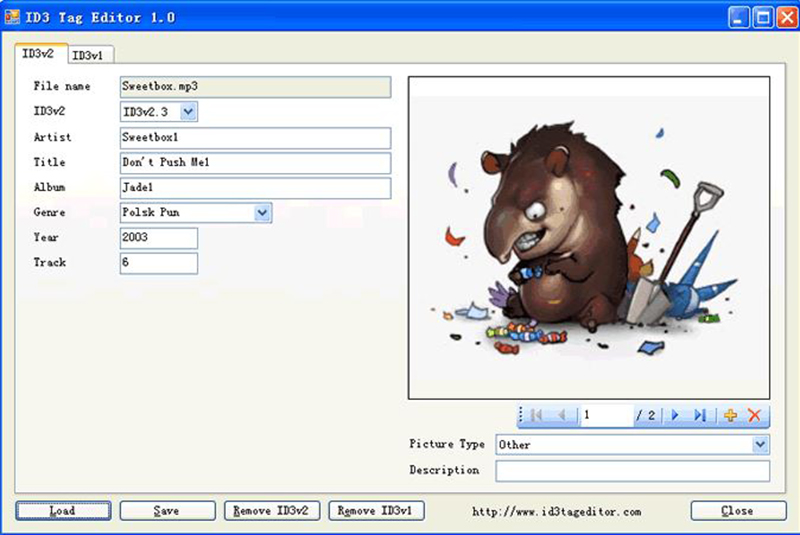
Step 4 Save the Tags
Finally, click on the Save button, followed by the Close button to complete the process.
Best Alternative to the ID3 Tag Editor
Tidytag Music Tag Editor is an audio file tag editing tool, which allows you to edit the tags of audio files conveniently so that your audio files have better recognition. It also allows you to manage the audio file library and remove duplicate audio files. It will enable you to edit various audio files, including MP3, AIFF, AIF, M4A, M4R, FLAC and more.
Tidytag provides straightforward editing capabilities; even a novice user can handle the software with ease. Apart from that, it is easy to add files and compatible with iTunes as well.
Key Features
- Can rename a group of files and folders based on the tag information
- Batch process all missing or incorrect tags at once, such as song title, album, artist, release year, genre, track number, cover art, lyrics
- Manage files by moving them into separate folders based on their album, artist, album artist and genre
- Remove duplicates find in the music library
- Presence of a built-in music player
- Easy to use and compatible with iTunes
How to Edit ID3 Tags Using Tidytag
Step 1 Download Tidytag and Install it
The first thing you need to do is to download the official version of Tidytag and installed it in your device. You can download the latest version from here.
Step 2 Add Audio Files to Tidytag
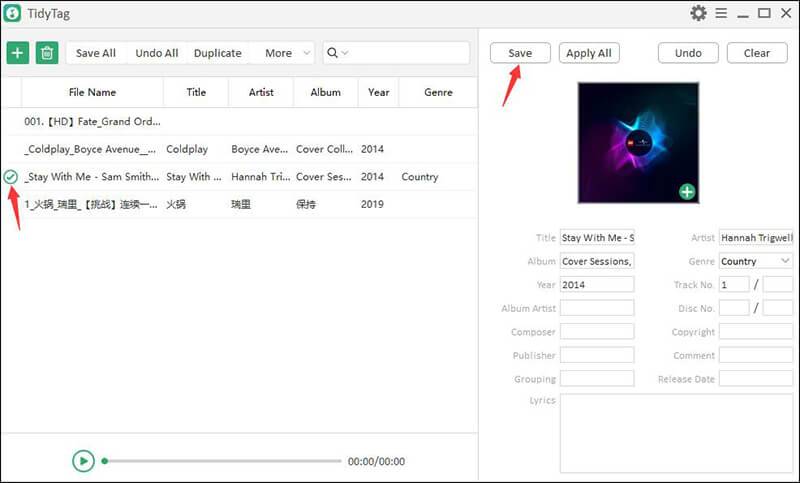
Drag all your music files and drop them into the home window of Tidytag. Or click on the “+” mark in the top left corner of the home window and browse the files you want to add.
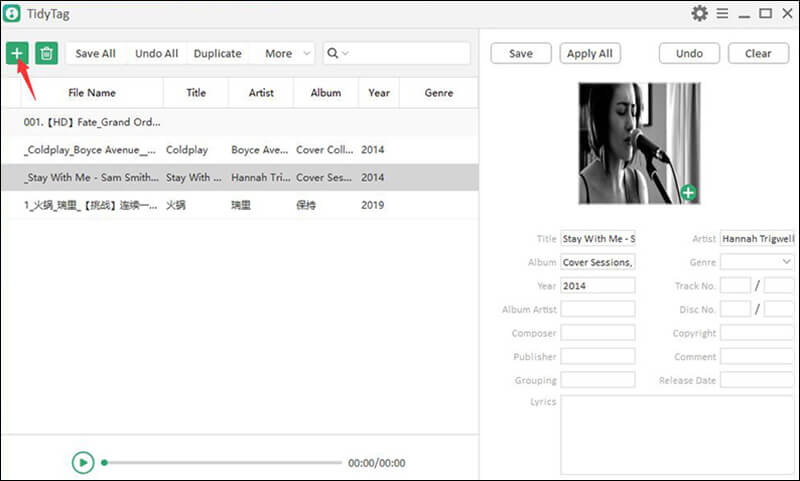
Step 3 Review the Metadata Tags
To modify and to add new metadata, click on the filename of the music file. Then Tidytag will automatically show the available metadata in the right side bar.
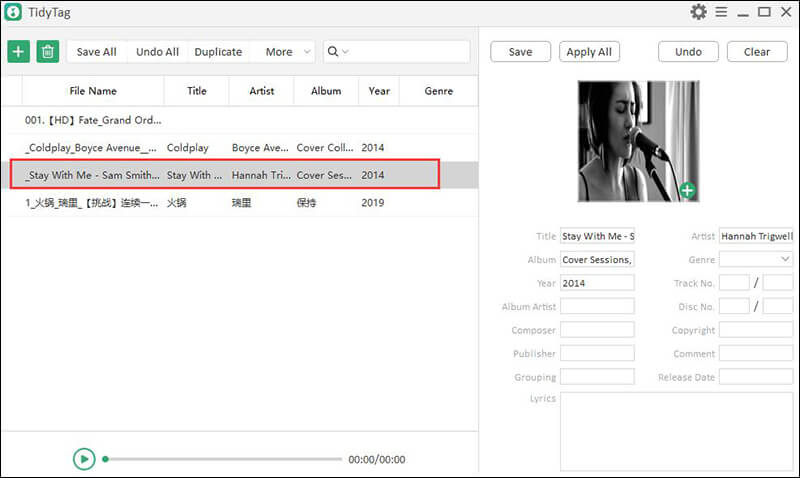
Step 4 Add or Modify Tags
If you want to change any metadata, click on the relevant file and do the necessary modification. To upload a new album cover, click on the + mark near the album cover and upload a new image.
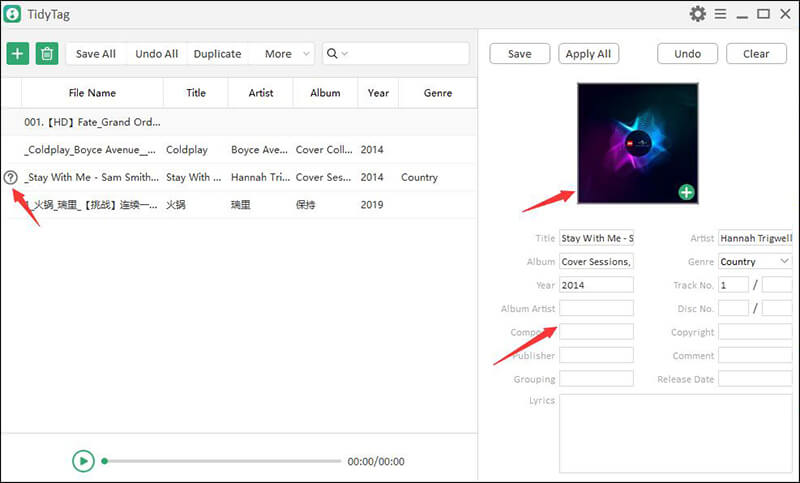
Step 5 Save the Tags
Finally, click on the Save button on the top of the window. Once the changes are saved properly, you’ll notice a ✔ symbol near to the music file name reflecting that the metadata is modified.
Conclusion
ID3 tag editor is one of the best utility software to edit metadata in your music files. It provides several options with user-friendly interfaces which makes the life of user easy. But it only support windows system.
If you want to manage your music library professionally on Mac, Tidytag is the only solution. It provides a various amount of premium features which is not present in the ID3 tag editor. Tidytag is more uncomplicated and straightforward as ID3 tag editor and one of the best in the market for ID3 tag editing.